10.31.2012

Conferences, Early Release Days, and Halloween...OH MY!

Raise your hand if you are so super happy today is OVER! 

We just finished Fall Parent Teacher Conferences at my school. Yesterday was the last day! I had all but two families show up, my team mate had 100% attendance... so as a team, we did pretty great!

I want to share one of the main documents we used during our conferences.  And let me tell you, this booklet was quite the hit with parents, I think because we involved students and had them write a letter to their parents.


 I loved the assessment page we included!! Everything in one place instead of flipping between multiple papers! Such a time saver! And a great reference for parents to have at home, too!
We folded all of the pages in half and stapled them together along the open side of the paper to create the booklets. 

The focus skills we listed are the skills we have focused on so far this year.  I highlighted the skills individual students were struggling with at this point in the year.

Our district gives us a wonderful Elementary Curriculum and Assessment Guide that highlights the skills we will work on throughout the year. We also had a CCSS informational sheet targeted at 2nd grade to help us better explain what the CCSS are and how we are transitioning to these new standards in our school and across our district.

Overall, the booklet was by far the biggest hit! It was quite the time saver, too  

I could say...
"These are all of the skills we have worked on so far in 2nd grade. Keep in mind we have only had about 35 days together so far!"

Then I could say...
"This highlighted skill is something we need to work on with (your student)" 

Then we would discuss what I see in the classroom, what they see at home, and what we can do to better support their student with that specific skill.


Perfect!  Our 20-short-minutes together were fast and well used!

Now, for your Halloween Treat!!!

I am putting my Halloween Themed-ELA Workshop packet on sale! 50% off!!!!  


Included are five easy to prepare Halloween-Themed ELA Workshop ideas!

These brightly colored activities include tons of fun clipart that will help put everyone in the Halloween-mood :)

Slide 1: Cover
Slides 2 - 8: Teacher Page; ABC and ZYX order activity (with recording pages and activity cards)
Slides 9 - 11: Teacher Page; Halloween-Themed Noun sort
Slides 12 - 14: Teacher Page; Color By Sound coloring pages (devil and frankenstein)
Slides 15 - 21: Teacher Page; Fact or Opinion activity cards
Slides 22 - 27: Teacher Page; Writing activities (story starters and personal narrative)

Slide 28: Thank You page! 

Here are some pictures of my students working through the stations today. They LOVED them! I was actually surprised and excited to see how quickly they were working, they wanted to badly to get to the next station!

Noun Sort

color-by-sound (long a and long i sounds)

I brought in skeleton and "My Body" books to add a Read to Someone Station

I wanted to add in technology (and some math) so here my students are playing a match/memory game.

I found this game on Interactive Education's blog. If you haven't heard of their blog, definitely check it out! Every day they share a fun educational game and website that can be easily added into your classroom when you have a few extra minutes, or if you are looking for an easy way to integrate technology into your stations!

10.14.2012

Story Elements--Characters

2nd grade started our first RTI group on October 8th. We wanted to start with Story Elements (RL2.1, RL2.5 and RL2.7) because we felt like our students need to have a strong understanding of character, setting, plot, problem, and solution if we are going to dig deeper with them this year. 

So we started with a pre-test where students listened to a Henry and Mudge story, a short story. They then wrote down the characters and setting(s). We had them draw and label Mudge (labeling why he is just the right dog for Henry).

Students then cut apart sentences that we typed from the story and glued them to their test paper in the correct order.

Finally, students used their highlighters to highlight the sentence that tells the problem, and the sentence that tells the solution.

We graded the assessments, grouped our students based on those assessment results mixing up the bottom half of our students so that not all of the lowest students were together. We figured out last year that when we placed all of our lowest students together in an RTI group, they made minimal growth. They did not participate, and it was frustrating for the teacher. They need students who can be models for them, who can work along side them. 

We started week one with Characters


I created these documents to help ensure the 2nd grade RTI team was on the same schedule and using similar phrases and procedures. Because we have such a short amount of time with our RTI groups it is essential that we maximize this time with well organized plans. We are lucky to have 2 para educators supporting us during this time, but unfortunate because we do not get a lot of time to meet with them and explain our expectations, what we want our students to leave this RTI group knowing, understanding... 

So these documents serve as a sort of guide and reminder :) So far they are working out great! My teammate and I sit down and quickly "sketch" out our plan and we gather materials we will need. I then take all of that information and type up the documents. We have the documents and materials ready for our paras so they do not have to worry about preparing anything. 

I think that because this is our second year doing RTI groups by grade level, we have a much better handle on things. We know how much time it should take us to plan, we know when we are wasting time and need to just make a decision, and we know how to maximize each other's strengths as teachers and as individuals.

Here are some pictures from our first week: Characters! (I forgot to take pictures on our third day when students recreated the character posters that they then took home and became the teachers, teaching their family about what a character is)

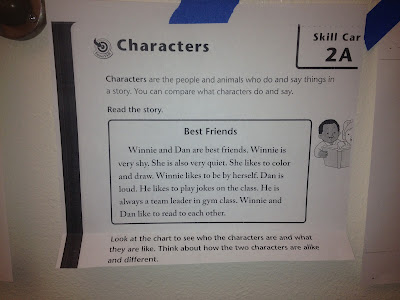
 Character Poster: definition and sketches
Sketches are important to help our low readers and ELL students better understand and remember this definition of a character.

 Character Connection Frame


 Example of a short story we read to our groups.
 When we started using Graphic Organizers we cut sentences apart and had students sort the sentences under the character names on the organizer. This was the perfect scaffolding activity for our low groups.

Tape bubbles. Prepared ahead of time to save us time when we added sentences to the character charts.

Another short story.

Here I demonstrated how to create the character Graphic Organizer.
We filled in the information together.
I demonstrated the "Look Back" comprehension strategy and first read the story through.
Then identified the characters.
Then focused only on Beth (reread the story) and we wrote down everything we read about Beth.
Then focused only on Todd (reread the story) and we wrote down everything we read about Todd.


A response frame I found at HelloLiteracy You MUST READ Jen's blog post!! I have read, reread, and shared this particular post multiple times. It is PACKED with valuable and eye-opening information about CCSS. Please read!!


This coming week we are keeping the groups the same and focusing on Setting.


I will post pictures from our setting activities this week!

Beautiful + Simple Fall Art

At our school we have parent volunteers come in to classrooms and teach our students art each month. These wonderful volunteers are called our Art Docents. We learn about different artists, different techniques, we use lots of fun materials, and we create BEAUTIFUL art together.

Art Docents usually start coming into the classroom mid October, but my blank hall space was eating me alive so I took an afternoon (about 3 weeks ago...sorry for the post-delay) and we created some beautiful and simple Fall Art together!


I got this idea from Deep Space Sparkle under 2nd grade art ideas. Go check out Patty's ideas! She is amazing!!

Supplies Needed:
Tissue paper cut into rectangles (mine were about 3" x 5")
Sharpie pens
Construction paper, I chose light blue to look like the leaves were falling through the sky
Liquid glue, watered down
Paint brushes
Outlines of fall leaves for students to trace, I found mine in google images

First, we read a book about fall leaves, we discussed fall leaves, colors we see and notice. Then I introduced the art project. And YAYYYYYYYYY!!! Were they ever excited!

Step One: Students trace leaves carefully on to the tissue paper. Surprisingly the sharpies did not tear the tissue paper AT ALL!

Step Two: (I missed getting a picture of this step) Student carefully cut around the outline of the leaf. I had my students leave a tiny border and not cut right on the sharpie outline.

Step Three: Students place their cut out leaves onto the construction paper then use the glue + water mixture to paint on the glue, gluing the leaves in place. I modeled this step for students a few times. I showed them how to start at the top and in nice long strokes paint down the leaf so it wouldn't get bunched up or messy. They did AWESOME!

Step Four: Let dry. We finished just before recess (yes I planned that!!) and they were not quite dry when we came back. We left them on our desks to completely dry, then I hung them up in the hall for everyone to gawk at :)


A beautiful and simple way to add color, art, and fun to our hallway.

PS. Don't you love the hanging space we have for our art? Every classroom has a similar space that our school put up outside our classrooms for art. They are those long wire-like hanging systems from IKEA. We use clips to attach the art and the sign in the middle lets people know which class the art comes from!